Image 1.1: Connection Dialog
2. Running your own Tracksail server
The idea in Tracksail is to guide your sailing boat through a race track. Each single track has a fixed amount of laps it must be sailed through to reach the goal. The track consists of gates represented with 2 buoys, a red one and a green one. When going through a gate, the red buoy of the gate must be on your left and the green buoy on your right.
Tracksail is distributed in a single zip file containing the class files and images needed to run both the client and the server. You can find the zip file for the most recent version here.
To install the files, create a directory where you wish to install the game and unzip the files to that directory.
There's a shell script provided in the zip for Unix-like systems (e.g. Linux) that makes starting the Tracksail client very simple. Just go to the tracksail directory created during the unzipping, run the client.sh script and enjoy the game!
On Windows, you need to do things just a bit harder way. If anyone knowledgeable with Windows would like to contribute a bat-file to make running Tracksail the easy way on Windows platform, I'd appreciate it.
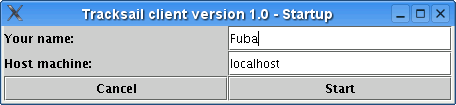
To run the client open a shell or MS-DOS prompt, go to the bin directory, created during the unzipping process, and run command java Tracksail. You should see a connection dialog as shown in Image 1.1. Here you can set your name and enter the IP number for the server you want to play in.
Tracksail server doesn't identify you by the name you give, it gives you an internal unique id number. This means you can share a name with any number of other players in the same server.
If you are ready to go ahead, click on the "Start" button. You can leave by clicking on "Cancel", in case you think coming this far was a mistake.
After you have established connection to a Tracksail server, you are placed in a lobby room like the one shown in Image 1.2. Here you can chat with other players before joining an actual race - and of course talk about the race afterwards :)

On the top of this window, you can see your name. Next to the name field is the "Exit" button. That's the button you should click when your boss comes in sight and you suddenly wish to leave the game ;)
Messages sent by players (and by the server) are shown in a large box. There are scroll bars so you can look at the text that goes over the box boundaries and scroll up to see what has been said earlier.
There's a smaller text field below, where you can write your own messages. Clicking on the "Say" button will send your ramblings for the world to see.
On the right, there is a "Join Game" -button. Below this, there is a list of available races you can attend. To join a race, click on it's name in the list and click the "Join Game" -button.
In Tracksail, any player can create a race by clicking on the "Create Game" -button. To create a race, write a more or less descriptive game name in the text field above the button and click "Create Game". This will create a new race which others will see in the list of available races. The player who has created a race is known as a "Game Master" for that race. Read on for further explanation on this.
When you have joined a race, you are brought in a racing screen, shown in Image 1.3. The top and bottom look the same and work just as they did in the lobby. The chat messages are now printed on the bottom left of the game view window - that's the one showing the sea, the boats and such. In the game view, you can see several other important things as well.
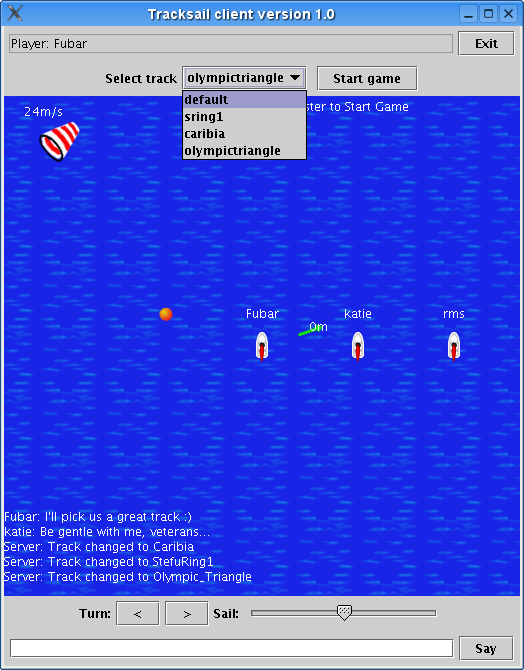
On the top left, there's a wind meter. The bag shows the direction of the wind and the number above it shows the wind velocity in meters per second.
To the right from these, you can see the status of the race, laps you have completed and total number of laps to complete. Status is either "Racing" or "Waiting Game Master to Start Game". When racing, your ship moves and you can navigate it. When "Waiting ...", the Game Master is probably waiting for more players to join the race before starting it, choosing a track or just feels like delaying the start for a bit longer.
When looking at the boats, you can see the name of the player they belong to above them. Your own boat also shows a green arrow pointing towards the next gate and the distance there in meters.
In order to maneuver your boat, you can use the buttons and the slider below the game view. The buttons turn your boat to portboard or starboard as specified by the arrows in them. For the non-sailors: portboard is on your left when looking forward from the back of your boat, starboard is on your right.
The slider controls your sail. The more it is to the left, the tighter the sail is locked to point directly backwards. When the slider is completely to the right, your sail will be completely loose to open. The sail won't move to point further forward than 90 degrees to the side from your boat.
You can also see a drop-down list and a button above the game view. These are disabled if you aren't the Game Master in this race. The drop-down box allows the Game Master to choose a track from those available in the server before beginning the race. When the Game Master feels that the game is ready to begin, he starts it with the "Start Game" -button.
Tracksail is distributed in a single zip file containing the class files and images needed to run both the client and the server. You can find the zip file here. The package includes a few tracks as well.
To install the files, create a directory where you wish to install the game. Unzip the files to that directory.
This way works in Unix-like systems (e.g. Linux).
Unzipping the package creates a tracksail directory. Move to it and run the server.sh script.
On Windows, you need to do things quite a bit harder way. If anyone knowledgeable with Windows would like to contribute a bat-file to make running Tracksail the easy way on Windows platform, I'd appreciate it.
To start the server, open a shell or MS-DOS prompt and go to the directory where you installed the files. There should be a bin-directory with the binaries. Change to that directory.
In order to run the server, you must first start the rmi service provided by Java. If you don't have it running already, do rmiregistry & in Linux/Unix or start rmiregistry in Windows.
After rmi is running, you can start the server with command: java -Djava.security.policy=../policy Server. Those concerned about their security may wish to see the policy file in the main directory first, of course.
We encountered some file-permission problems during server testing in Windows environments using the policy file. If you have trouble running the server, there's also a policy_all file included that removes all security restrictions. The server starts with java -Djava.security.policy=../policy_all Server command using this file. However, using it is not recommended.
After the server has been started, it will begin to accept client connections. All you need to do is tell people where to connect. Running your own Tracksail server isn't too hard, is it? :)
The most important command for a new user is probably "help", which gives you a list of all valid commands with a short explanation of each. Here we give just a bit longer explanations.
The "exit" command ends all current races, closes all client connections and exits the server.
The "players" command gives you a list of all players currently connected. It shows a table with their unique id number and name. You might need the id number for the "kick" command.
The "tracks" command lists the races and shows which track is currently loaded in each one.
The "update" command updates the list of available tracks. See below, "Managing tracks", for further information.
The "kick" command can be used to get rid of annoying players. It takes as a parameter the player id number to be kicked or the word "all". If "all" is given, all players are kicked out, if an id, only the player with that id. Logical, huh?
The tracks are stored in the tracks directory. They have a ".track" extension. There's one another file that has to reside in this directory: the tracklist.
Each time the server is started, or the "update" command is given to it, it reads the tracklist file to find out which tracks are installed. This means that each time you add a new track in the tracks directory, you must add a line in the tracklist that has the filename without the ".track" extension. As an example, to add a new track with filename "cooltrack.track", you do the following:
Save the "cooltrack.track" file in the tracks directory Add the line "cooltrack" in the tracklist file Call the "update" command in the server or restart the serverAccordingly, when you remove a trackfile, you must remove the line referring to it from the tracklist file.
The Tracksail track files are plain text files with a ".track" extension and thus editable with your favorite text editor. They should be stored in the "tracks" directory. To make you familiar with the syntax of a track file, we'll walk you through the "default.track" that's included in the package.
TRACK;Default
LAPS;1 # Comments can be here as well
MAXTIME;300
CHANGEWIND;10
MINWINDD;10
MAXWINDD;40
MINWINDV;10
MAXWINDV;20
NUMPORTS;5
# PORT;portboard_x;portboard_y;starboard_x;starboard_y
PORT;10;40;30;-10
PORT;160;50;170;10
PORT;150;100;170;130
PORT;50;80;30;100
PORT;-100;30;-140;30
Listing 3.1: default.track
The trackfile consists of flags (e.g. TRACK) followed by values related to that flag. Flags are separated from values and values from each other with semicolons (;). Each line begins with a flag and contains only one flag. Comments begin with a hashmark (#) and can be on a line of their own or at the end of any line.
Ok, now that all that basic stuff has been said, let's get into the track itself, shall we. A trackfile begins with a "TRACK" flag. It's followed by one value, the track name. This is a string and is not related to the filename of the track. There are limitations, though - you can't have spaces or semicolons in the name.
The next flag in a trackfile is "LAPS", which is followed by one integer value. This tells how many times the track is sailed through in a single race.
Then comes the "MAXTIME" flag, also followed by an integer value. This tells how many seconds at most the race will last. After this time has been exceeded, the race ends whether all players have reached the goal or not.
Next we get to the wind control flags. They are all followed by one integer value. "CHANGEWIND" tells how often the wind direction and velocity will change in seconds. "MINWINDD" and "MAXWINDD" tell the minimum and maximum wind direction respectively. The direction is given in degrees where 0 is directly to the right. "MINWINDV" and "MAXWINDV" set the minimum and maximum wind velocity, given in meters per second.
After the wind settings are done, we start to place the gates in the track. "NUMPORTS" tells the number of gates the track has as a single integer value. This line is followed by as many lines with "PORT" flag as this line specifies. Each "PORT" flag is followed by four integer values which give the coordinates for the buoys. The coordinates are given in the following order: x-coordinate of the portboard buoy, y-coordinate of the portboard buoy, x-coordinate of the starboard buoy, y-coordinate of the starboard buoy. The starting line is placed in the first gate, so you only have to worry about relative coordinates when planning the track.
The gates are the last thing a trackfile specifies. Not too difficult, right? So go ahead and make your dreamtrack! 8-)